Showing posts with label craft. Show all posts

Monday, 24 March 2014

Spring Art: Butterflies, Butterflies, Butterflies...

This art project was inspired by the beautiful colors of the spring. We love using recycled materials for our art projects. So for this project, we used painted paper that we had salvaged from another art project.

Materials Needed: 
  • Paper painted in a variety of bright colors (you can paint over recycled paper with bright watercolor paints; allow time for the papers to dry before proceeding with this project)
  • Paper Punch (we used a butterfly one; you can use other spring shapes like a flower, bird, etc.)
  • Glue stick
  • Plain/white art paper
  • Scissors

What to do: 

1. Prepare for this project in advance by painting papers using a variety of watercolor paints. We used a large bristle paint brush to paint each of the papers with a yellow, red, orange, and green color. Allow time for the paper to dry.


© Everything Family Guide

2. Next, you need a paper punch for producing various colored shapes. Tip: Remember to keep your colors separate for creating a striped (horizontal or vertical) affect.
© Everything Family Guide
3. We started the project by applying glue on the plain/white paper. Then, we carefully stuck each butterfly/shape on the glued space.  
Tip: When the glue is applied on the paper it may dry out really fast, so it`s important to only apply glue when you are ready. We used a small plate to separate each colored shape; to work efficiently and with ease.

© Everything Family Guide

4. After the red butterflies, we added orange, green and yellow ones. We applied the shapes in a horizontal pattern. At the end, we cut off small strips from the leftover paper to form a border. Then, we glued the paper strips to add a border to the art project. 

Here you have it...Paper Punched Butterflies! Aren't they cute?

© Everything Family Guide
We love the beautiful colors of spring..how about you?

Annie

Thursday, 13 March 2014

Recycled Magazine Envelopes

We love to reuse and recycle things at our home! Here is an awesome project that is super cute and crafty for your little one. 

Materials Needed
  • White paper for tracing envelope template
  • Marker
  • Paper from Magazines
  • Scissors
  • Glue stick
  • Address Label stickers (Optional)

Here is what we did...

Prep: First, I traced a shape/template of an envelope on paper (inspired by the Country Living Magazine). Then I cut it out for the project.
Envelope Template © Everything Family Guide

I traced the pattern on the magazine paper using a marker, to help my preschooler see the shape for cutting.


Tracing the Template on Magazine Paper © Everything Family Guide

Then we cut the shape/template using child-safe scissors.


Cutting the Envelope template © Everything Family Guide


The Magazine Cut-out © Everything Family Guide

Now the fun begins, we folded the two side flaps inwards. Next, we applied glue on the two side small flaps using a glue stick. Then we folded only the bottom half towards the flaps to secure the bottom of the envelope in place. We allowed the envelopes to dry before folding the top flap to close the envelope.

© Everything Family Guide

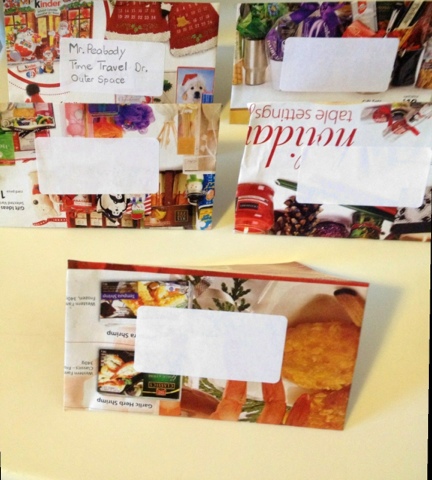
For finishing touches, we stuck address label stickers to the front of the envelope! Now you are all done! The envelopes can used to deliver secret messages between siblings/friends or for slipping in a love note to momma or papa dear! My kids loved these so much that we ended up making some more!

© Everything Family Guide

This was an awesome recycling project and my preschooler loved turning magazine pages into envelopes! Are there any other ways that you use to fold envelopes? Please share your ideas and suggestions with us!

Annie

Friday, 14 February 2014

Recycled Paper Weaving Craft

Here is a simple and creative craft that you can do with your little ones. All you need is paper (newspaper, magazine paper, paper bags or any other recyclable paper), glue, scissors, and pre-cut strips of paper.

First you need to fold the paper in half and cut strips that are spread at least 1/2 or 1 inch apart. Always cut from the folded side up. Don't cut all the way and leave at least a two inch space at the end. Now open the folded paper and demonstrate how to weave a strip of paper with the under and over motions. It is important to do a demonstration to guide your child. To secure the strips I glued them to the paper at the end. Finish weaving all paper strips and glue the ending corners to secure the weaved paper in place.

© Everything Family Guide

The Finished Project - remember to adjust the strips closer together so as not to leave any space in between. This will help in achieving a checkerboard effect.

© Everything Family Guide

Paper weaving is a great way to reuse left over scraps of paper. You can also do patterns while paper weaving by adding different colored paper strips. Another unique way to do paper weaving is by weaving shape cut-outs. Here is a heart-shaped weaving project we are working on currently...


© Everything Family Guide

Hope you are having a loving day ❤❤❤
Annie